Understanding the BIOS: A Foundation for Your Computer
The BIOS, or Basic Input/Output System, is a critical component in any computer system. Acting as the interface between the operating system and hardware, the BIOS initializes system hardware upon boot-up and provides runtime services for the operating system and programs. For those seeking to enhance their PC performance, understanding how to navigate and adjust settings within the motherboard BIOS is essential for effective system management.
Knowing how to optimize your BIOS settings can dramatically improve your computer’s performance and stability. This guide will cover vital aspects of the motherboard BIOS, including essential settings, troubleshooting tips, and best practices for maximizing your PC’s capabilities. Whether you’re a first-time user or a seasoned builder, understanding the BIOS can greatly enhance your user experience.
What is the BIOS of a Motherboard?
1. Defining BIOS
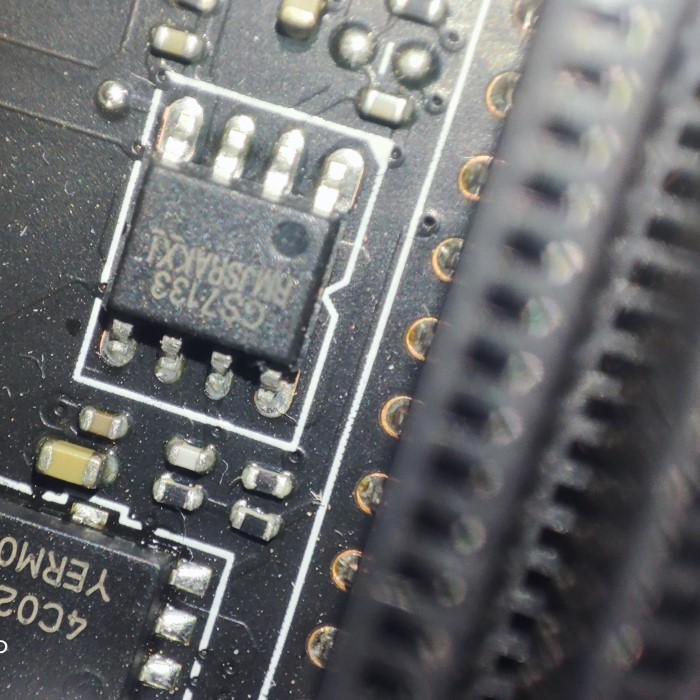
The BIOS is a type of firmware stored on a chip on your motherboard. It is responsible for the boot process and is the first software that runs when your PC starts.
2. Functions of BIOS
The motherboard BIOS serves several key functions:
- Hardware Initialization: Ensures that essential components such as the CPU, RAM, and storage drives are detected and initialized.
- Boot Loader: Initiates the process of loading the operating system by handing off control from the BIOS to the boot loader.
- Setup Utility: Provides a configuration interface where users can adjust hardware settings and optimize system performance.
Accessing Your Motherboard BIOS
1. Entering the BIOS
Accessing the motherboard BIOS is typically done during system startup. The exact method may vary based on the motherboard manufacturer, but common keys include:
- Delete: Frequently used by desktop systems.
- F2: Commonly used on laptops and some higher-end desktops.
- Esc or F10: Also utilized by various brands.
To access the BIOS:
- Power On/Restart Your Computer: Begin turning on your PC or restarting it.
- Press the Designated Key: Start pressing the specified key repeatedly until the BIOS screen appears. Timing is critical; you must do this before the operating system begins to load.
Once inside the BIOS, you will typically encounter a text-based user interface. You can use the keyboard arrows to navigate through various menus. Commonly seen sections include:
Main Menu
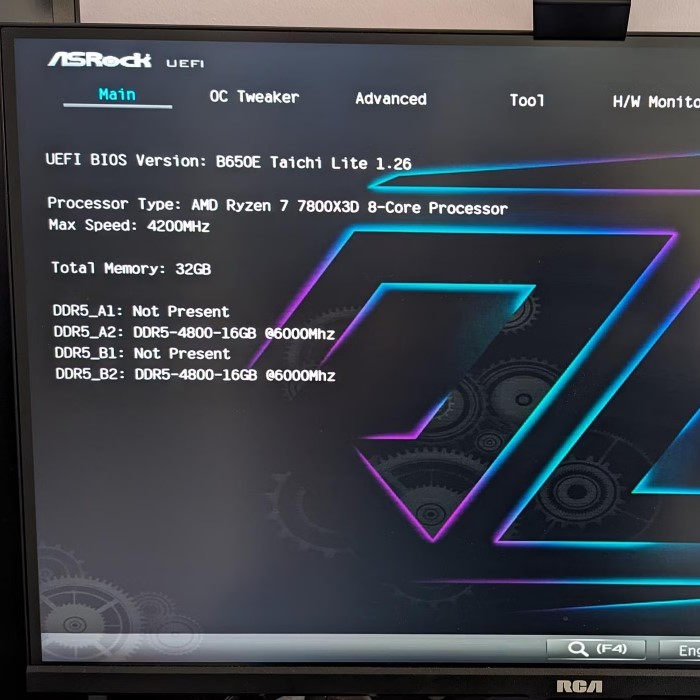
- Overview of System Basics: The Main menu in the motherboard BIOS provides a snapshot of essential system information. This includes fundamental details that are crucial for understanding your PC’s hardware configuration.
- CPU Details: This section typically displays the model, clock speed, and core count of the installed CPU. Users can quickly verify whether the processor is functioning correctly and operating at the intended specifications.
- Installed Memory: The Main menu also shows information about the installed RAM. This includes the total amount of memory, the type (such as DDR4 or DDR5), and the current operating frequency. This information helps users ensure their memory is correctly recognized by the system.
- System Time and Date: Often included in the Main menu is the system time and date, which can be adjusted. Keeping the date and time accurate is essential for proper logging and system functions.
Advanced Menu
- Technical Configurations: The Advanced menu is where users can access more complex settings that allow for deeper customization of the motherboard and associated components.
- CPU Configuration: In this section, users can adjust core settings for the CPU, such as enabling or disabling features like Intel Turbo Boost or AMD Precision Boost. Customizing these options can help improve performance for specific applications.
- RAM Timings: This section often allows for configuration of RAM timings, including CAS latency and other related settings. Users can tweak these values for optimizing memory performance, especially if they are pursuing overclocking.
- Hardware Monitoring: The Advanced menu frequently includes hardware monitoring options. Users can check the status of system temperatures, fan speeds, and voltages. Having this information is vital for maintaining system health and performance.
Boot Menu
- Managing Boot Order: The Boot menu is crucial for determining the sequence in which devices are authorized to boot the system. Users can arrange devices such as hard drives, SSDs, USB drives, and optical drives based on their preferred boot sequence.
- Boot Option Prioritization: This allows users to select which device the BIOS should prioritize first when the computer starts. For example, if you want to boot from a USB drive to install an operating system, it should be set higher than other drives in the list.
- Enabling Fast Boot: Some BIOS versions allow users to enable or disable Fast Boot options. Enabling this feature can reduce boot times by skipping certain checks during the startup process.
- Legacy Support Settings: The Boot menu may also contain options to enable or disable legacy support for older drives and operating systems, which can be particularly useful for users running older software.
Exit Menu
- Saving Changes: The Exit menu provides options for saving any changes made within the BIOS. Users can select “Save Changes and Exit” to ensure that their configurations are applied when the system restarts.
- Discard Changes: If users do not wish to save their changes, the Exit menu also offers the option to “Discard Changes and Exit.” This allows users to return to the previous BIOS settings without making any permanent changes.
- Load Optimal Defaults: The Exit menu often includes a feature to “Load Optimal Defaults.” This option restores factory settings for the BIOS, which can be helpful for troubleshooting or if a user encounters issues after making several changes.
- System Restart Options: Finally, the Exit menu typically contains an option to restart the system immediately, allowing users to quickly resume their work or apply new settings for testing after exiting the BIOS setup.
Key BIOS Settings to Optimize Your PC
1. Adjusting Boot Order
The boot order determines which devices your computer will prioritize for booting. Configuring this setting can improve startup times.
- Changing Boot Sequence: Within the Boot menu, adjust the order of devices so that your primary hard drive or SSD with the operating system is the first option. To do this, select the device and move it to the top of the list.
2. Enabling XMP Profiles for RAM
XMP, or Intel’s Extreme Memory Profile, allows your RAM to run at its advertised speeds. This can lead to improved overall system performance, especially in memory-intensive tasks like gaming or content creation.
- Activating XMP Profiles: Find the memory configuration settings in the BIOS, and enable the XMP profile. Select the profile that corresponds to your RAM specifications for optimal performance.
3. Adjusting CPU Settings
Adjusting certain CPU settings can improve performance and efficiency.
- Turbo Boost and Overclocking: If your processor supports Turbo Boost or overclocking, you can enable these features in the BIOS. Turbo Boost allows the CPU to run above its base clock speed during high-demand situations. Be cautious, as overclocking can lead to overheating if not managed effectively.
4. Managing Power Settings
Power settings in the BIOS can help optimize your system’s energy consumption.
- C-States: To reduce power usage during idle times, enable C-States for your processor. This feature allows the CPU to enter low-power modes when not in use.
Troubleshooting Common BIOS Issues
While navigating the motherboard BIOS can appear complex, most issues can be resolved with simple troubleshooting methods.
1. Computer Won’t Boot
If your PC fails to boot after making changes in the BIOS, a reset often resolves the issue.
- Restoring Default Settings: Navigate to the Exit menu and select “Load Setup Defaults” to restore original BIOS settings. This will often resolve boot problems resulting from configuration errors.
2. Peripheral Not Recognized
If a connected device such as a keyboard or mouse is not recognized, check the BIOS settings.
- USB Configuration Settings: In the BIOS menu, ensure that USB ports are enabled. Look for options like “Legacy USB Support” and ensure it is turned on to recognize older devices accurately.
Frequently Asked Questions
1. What is the BIOS of a motherboard?
The BIOS of a motherboard is firmware that initializes hardware during the boot process and provides critical configuration options for the system.
2. How do I access my motherboard BIOS?
To access your motherboard BIOS, restart your computer and press the designated key (typically Delete, F2, or Esc) during startup to enter the BIOS setup utility.
3. How do I see my motherboard BIOS?
You can view your motherboard BIOS by restarting your computer and pressing the designated key to enter the BIOS setup. Once there, you can navigate through the settings and options.
4. What is the F12 key for in BIOS?
The F12 key is often used to access the boot menu. Pressing F12 during startup typically allows you to choose which device to boot from without needing to enter the BIOS setup.
Conclusion
In conclusion, navigating your motherboard BIOS is a vital skill for anyone looking to optimize their PC’s performance. From adjusting boot orders to enabling memory profiles, understanding which settings to modify can significantly enhance your computing experience.
As technology continues to evolve, the ability to tweak BIOS settings remains an important aspect of system management. By familiarizing yourself with the various options available within the BIOS, you can ensure your computer operates at its peak performance.
Whether you’re a casual user or a dedicated enthusiast, exploring your motherboard BIOS offers an opportunity to get the most out of your system. Use this guide to advance your knowledge and confidently make adjustments that lead to better performance and an enhanced overall experience. Remember to approach adjustments carefully and refer to your motherboard’s user manual for specific details related to your model. Embrace the power of your BIOS, and take control of your computer’s potential!