If you’re looking to turbocharge your computing experience, installing a graphics processing unit (GPU) is often a significant first step to achieving that goal. Whether you’re a gamer seeking smooth visuals, a designer demanding enhanced capabilities, or simply someone who needs a reliable setup for video editing, the right GPU can make all the difference. In this article, we aim to provide you with essential tips to install gpu effectively, ensuring that your computer setup operates at its highest possible level.
Understanding the GPU
Before diving into the installation, it’s essential to understand what a GPU is and its role within your computer system. A GPU, or graphics processing unit, is a specialized processor designed specifically to accelerate graphics rendering. Unlike the CPU, which is your computer’s central brain and responsible for general tasks, the GPU is optimized for handling complex visual calculations needed for 3D rendering, image processing, and video playback.
Why You Should Upgrade Your GPU
- Enhanced Visual Quality: A dedicated GPU improves visual quality for gaming, rendering, and graphic design, making scenes more realistic and detailed.
- Higher Frame Rates: For gamers, a dedicated GPU ensures a smooth gaming experience. Higher frame rates lead to more responsive gameplay.
- Parallel Processing: Modern GPUs are designed to handle multiple tasks simultaneously, allowing for faster processing in applications like video editing and 3D rendering.
- Future Proofing: Newer games and applications often require more graphical power, and upgrading your GPU can make sure you keep up with software demands.
Preparing for Installation
Gather the Necessary Tools
Before you start the installation process, ensure you have all the necessary tools and materials:
- Screwdriver: You typically need a Phillips screwdriver for opening your PC case and securing the GPU.
- Anti-static Wrist Strap: This tool helps prevent static electricity that could damage your components.
- New GPU: Of course, you need your new GPU itself, which should come with an installation manual.
- User Manual: If your motherboard has specific installation requirements, keep this handy.
Check Compatibility
Not all GPUs will fit in all computers. It’s essential to ensure compatibility with the following:
- Motherboard Slot: Most modern GPUs use the PCIe (Peripheral Component Interconnect Express) slot. Check that you have an available PCIe x16 slot.
- Power Supply Unit (PSU): Ensure that your PSU provides sufficient wattage to power the new GPU and has the required power connectors.
- Physical Space: Measure the space available within your PC case to ensure your GPU will fit without obstruction.
Checking these aspects can help sidestep potential frustrations during installation.
Prepare Your Workspace
Creating an optimal workspace is crucial for a smooth installation process:
- Clean Area: Select a clean, clutter-free surface for easy access to tools and components.
- Good Lighting: Ensure your workspace is well-lit to avoid mistakes while handling intricate parts.
- Static-Free Environment: To minimize static electricity risks, avoid working on carpets and use an anti-static wrist strap if possible.
Step-by-Step Guide to Installing Your GPU
Now that you’re prepared, let’s delve into the step-by-step process of installing your GPU.
Step 1: Power Down and Open the Case
Begin by powering down your computer completely and unplugging it from the electrical outlet. Disconnect all peripherals, including the monitor, keyboard, and mouse.
Remove the Side Panel
Most PC cases have screws that secure the side panel. Use your screwdriver to remove these screws and carefully slide off the side panel to expose the interior of your computer.
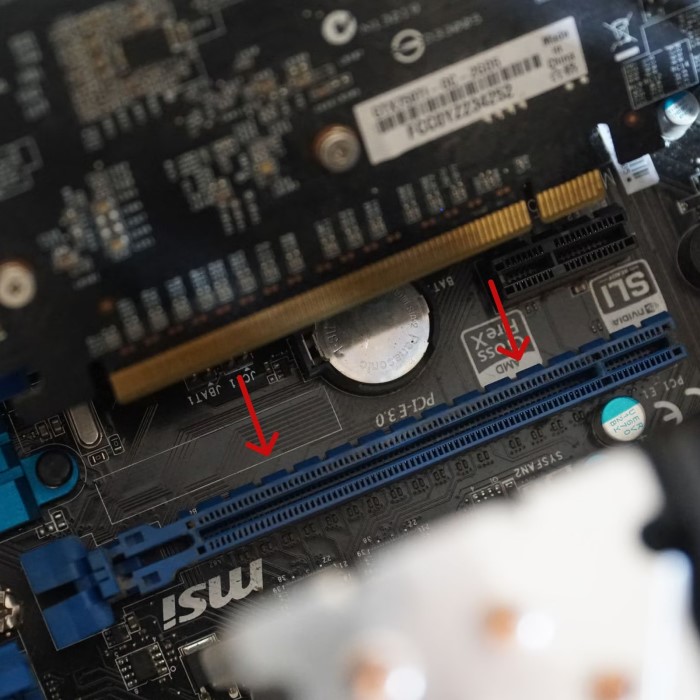
Step 2: Locate the PCIe Slot
Identify the PCIe slot on your motherboard. This slot is usually the longest one, often found towards the lower part of the motherboard. Be aware of the orientation; the clip should be facing outward for easier installation.
Step 3: Remove Existing Graphics Card (if applicable)
If your computer already has a graphics card installed:
- Carefully unscrew it from the bracket that secures it to the case.
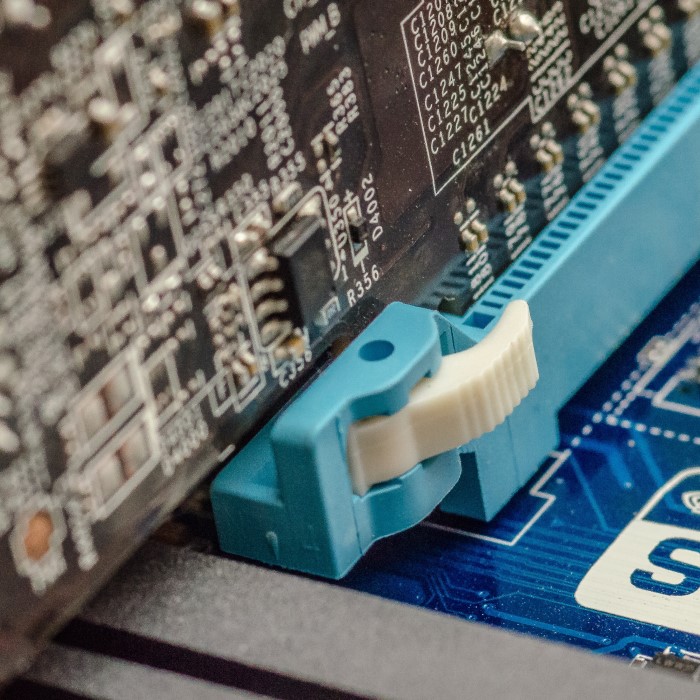
- Gently push down the clip at the end of the PCIe slot to release the existing card.
- Remove it by gently pulling it upward while supporting the card.
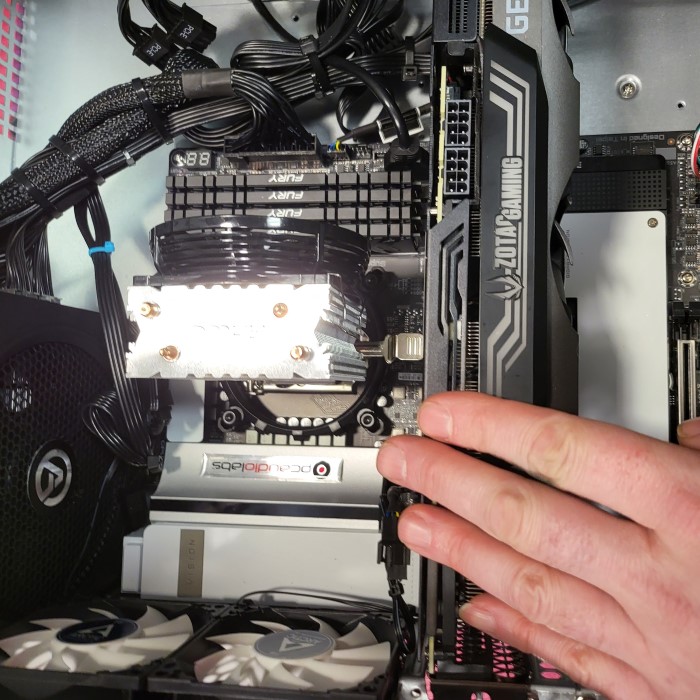
Step 4: Insert the New GPU
Take your new GPU out of its packaging and handle it carefully by the edges to avoid touching sensitive components.
Align and Insert
- Align: Position the GPU so that the PCIe connector aligns with the PCIe slot. The back end of the GPU should line up with the I/O shield on the back of your case.
- Insert: Firmly but gently press the GPU straight down into the PCIe slot until you hear a click, which indicates that it’s seated properly. The clip on the side of the PCIe slot should click into place.
Step 5: Secure the GPU
After the GPU is seated properly, secure it to your case by placing screws into the backplate of the GPU and tightening them. This prevents movement and provides stability.
Step 6: Connect Power Cables
Identify the power connectors on the GPU and connect them to the appropriate cables from your PSU. Most modern GPUs require additional power from the power supply, typically 6-pin or 8-pin connectors.
- Make sure the cables are plugged in firmly. Double-check the connections to ensure there are no loose ends.
Step 7: Reassemble Your Computer
Once the GPU is successfully installed, it’s time to close your computer:
- Replace the side panel and secure it with the screws you had previously removed.
- Plug your computer back into the power outlet and reconnect all peripherals.
Step 8: Install GPU Drivers
After assembling your computer, power it on. Depending on your operating system, it may automatically recognize the new GPU. However, it is crucial to install the latest drivers for optimal performance.
Download and Install Drivers
- Visit Manufacturer’s Website: Go to websites such as NVIDIA or AMD, depending on your GPU brand.
- Find Driver Downloads: Navigate to the driver download section for your specific model.
- Download the Drivers: Follow the instructions provided to download and install the drivers. Be sure to select drivers that are compatible with your operating system.
Step 9: Testing Your New GPU
Once you’ve finished installing the drivers, it’s time to test the new hardware. Running benchmark tests can provide a clear picture of your GPU’s performance.
Run Benchmarking Software
Software such as 3DMark or Heaven Benchmark can assess the capabilities of your new GPU. During the tests:
- Monitor FPS: Look for frame rates you can achieve within different applications.
- Check Temperature: Use software tools like MSI Afterburner or HWMonitor to check temperatures. High temperatures may indicate inadequate cooling.
Troubleshooting Common Issues
Even with the best preparation, issues may occur during installation. Here are some common problems and their potential solutions:
GPU Not Detected
If your operating system doesn’t detect the new GPU:
- Recheck Connections: Ensure that the GPU is correctly seated in the PCIe slot and all power cables are correctly connected.
- Update BIOS: Sometimes, updating the motherboard’s BIOS can help recognize new hardware.
- Try Another Slot: If possible, try installing the GPU in a different PCIe slot on your motherboard to rule out slot issues.
Windows Won’t Boot
If Windows fails to start after installing the GPU:
- Revert to Integrated Graphics: If your motherboard has integrated graphics, remove the GPU and connect your monitor there. Boot the system to troubleshoot.
- Check PSU: Ensure that your power supply is adequate for the new GPU requirements. If necessary, upgrade the PSU.
Poor Performance
If you’re not getting the desired performance from your GPU:
- Check Driver Updates: Ensure that the drivers are up to date.
- Settings Adjustment: Within games or graphics-intensive applications, lower certain settings to improve performance until you can assess hardware limitations.
FAQs
How do I install my GPU?
To install gpu, power down your computer, remove the side panel, insert the GPU into the PCIe slot, secure it, and connect the necessary power cables. Finally, reassemble the case and install the latest drivers.
Can I add a GPU to my computer?
Yes, as long as your motherboard has a compatible PCIe slot and your power supply can meet the GPU’s power specifications, you can add a GPU to enhance your computer’s graphics capabilities.
What does GPU mean?
A GPU, or graphics processing unit, is a hardware component designed to accelerate the rendering of images, animations, and video for the computer, handling parallel processing tasks required for graphics.
Is installing a new GPU plug and play?
While some GPUs are detected automatically by the operating system, it’s generally recommended to install the appropriate drivers to ensure the hardware functions optimally.
Conclusion
Installing a GPU can significantly uplift your computer’s capabilities. By following the outlined steps and tips, you can ensure a successful install gpu that maximizes your machine’s potential for gaming, design, or video editing.
In summary, it’s crucial to prepare adequately, check compatibility, gather the right tools, and follow the correct installation procedures. Testing the GPU after installation and regularly updating drivers will maintain optimal performance. Always remember to troubleshoot common installation issues to avoid unnecessary disruptions.
Equipped with this knowledge, you’re now ready to install gpu and experience the enhanced performance that it brings. Enjoy your upgraded computing experience!
By incorporating these essential tips to install a GPU, you will unleash the full potential of your computer, paving the way for a more efficient and enjoyable experience.