1. Introduction: Why Clean Your Wireless Earbuds?
In the world of personal audio devices, wireless earbuds have become an indispensable part of our daily lives. With their compact design and immersive sound quality, they’re always there for us during workouts, commutes, and downtime. However, due to their intimate contact with our ears, earbuds can accumulate wax, dirt, and sweat over time, which not only affects hygiene but also impacts sound quality and device longevity. Regular cleaning is essential to maintain peak performance and extend the life of your wireless earbuds. This guide will take you through a comprehensive seven-step process to ensure your earbuds stay clean and in top condition.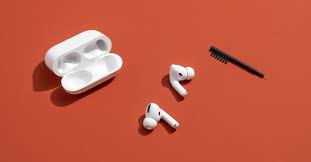
2. Gathering the Right Tools
Cleaning your wireless earbuds requires a gentle touch and the right tools to avoid damaging the delicate components. Here’s a list of essential items you’ll need for a thorough cleaning:
Soft-bristled Brush:
A small, soft brush designed for electronics is ideal. Alternatively, you can use an old toothbrush with extra-soft bristles. This tool helps to remove dirt, debris, and earwax from the nooks and crannies of your earbuds without scratching the surface.
Microfiber Cloth:
Opt for a lint-free microfiber cloth. These cloths are gentle on surfaces and highly effective at removing fingerprints, smudges, and grime without leaving streaks or residue. They’re perfect for wiping down the outer casing of your earbuds and their charging case.
Cotton Swabs/Q-tips:
Use non-abrasive cotton swabs (preferably with paper sticks) to clean hard-to-reach areas like speaker grilles and the edges around buttons. Remember not to insert them too deeply into the earbud’s sound port.
Distilled Water or Electronic Cleaner:
Distilled water is pure and free of minerals that could damage electronic devices. You can lightly dampen your cleaning tools with it. For a more specialized approach, consider using an electronic screen cleaner which is specifically designed to be safe on sensitive electronics.
Compressed Air:
Compressed air cans are useful for blasting out debris from charging ports, crevices, and tight spaces within the earbuds or charging case. Be sure to hold the can upright and maintain a safe distance to avoid liquid propellant entering the device.
Optional: Cleaning Solution:
Some manufacturers offer specialized earbud cleaning solutions that are safe for use on electronic components. If available, these can be used in conjunction with a microfiber cloth or cotton swab.
Lint-Free Storage Pouch:
While not a direct cleaning tool, having a lint-free pouch or bag to store your earbuds when not in use can help keep them cleaner for longer by protecting them from dust and debris.
Before beginning the cleaning process, ensure all tools are clean themselves to prevent transferring additional dirt onto your earbuds. With these tools at hand, you’re now ready to embark on a meticulous cleaning journey to restore your wireless earbuds to their pristine condition.
3. Disassembling Safely
Some wireless earbuds allow for partial disassembly for thorough cleaning. Check the manufacturer’s instructions before attempting this step. If possible, remove the ear tips and any silicone or foam covers. Be gentle throughout the process as these parts can be fragile. Store the removed pieces in a clean, safe place to avoid misplacement.
4. Initial Dusting and Brushing
Begin by brushing off any loose dust and debris from the earbud housings and ear tips with the soft-bristled brush. Pay particular attention to areas around buttons, microphone openings, and charging contacts. Use compressed air to clear out the charging case, being cautious not to blow moisture into the ports.
5. Detailed Cleaning of Ear Tips
For ear tips, dip a cotton swab in distilled water and gently rub around the inner and outer surfaces. Don’t soak the ear tips as excess water could damage the buds. Alternatively, use a specialized earbud cleaning solution if available. After cleaning, let them air dry completely before reattaching.
6. Wiping Down Surfaces
Dampen a microfiber cloth with distilled water or electronic cleaner and carefully wipe down the surface of each earbud and the charging case. Ensure the cloth isn’t too wet to prevent liquid from entering the earbuds. For stubborn stains or fingerprints, apply a bit more pressure but never so much that it might deform or crack the plastic.
7. Reassembling and Maintenance Tips
After you’ve thoroughly cleaned your wireless earbuds, it’s essential to reassemble them correctly and maintain them properly to ensure their longevity and optimal performance.
Reassembling:
- Gently Replace Parts: If any parts were removed for cleaning (such as silicone tips), carefully snap them back onto the earbud stem. Ensure they are seated firmly in place but avoid applying excessive force that could damage the fitting mechanism or the silicone tip itself.
- Check Connections: Double-check that all charging contacts, buttons, and other moving parts are free of debris and functioning smoothly. Confirm that earbuds are securely placed in their charging case if applicable.
- Power On and Test: Once everything is put together, power on your earbuds and test their connectivity, audio quality, and functionality of controls. This will help you verify that no water has seeped into sensitive areas and that the cleaning process hasn’t affected the performance.
Maintenance Tips:
- Regular Cleaning: Develop a habit of cleaning your earbuds every week or two, depending on usage. Regular maintenance prevents the buildup of earwax and dirt, which can degrade sound quality and potentially damage components.
- Use Properly Fitting Eartips: Make sure the eartips fit snugly but comfortably in your ear canal. The right size reduces earwax transfer and enhances sound quality. Replace worn or damaged eartips regularly.
- Avoid Moisture: Although many wireless earbuds are water-resistant, they’re not waterproof. Avoid exposing them to water for extended periods, and never submerge them. After exercising or being in humid conditions, dry your earbuds with a soft cloth before storing.
- Storage: Always store your earbuds in a cool, dry place away from direct sunlight. Use a clean, lint-free pouch to protect them from dust and scratches when not in use.
- Battery Care: Charge your earbuds regularly but avoid overcharging. Most devices have built-in protection against this, but it’s still wise to unplug them once fully charged. Also, don’t let the battery drain completely before recharging to extend its lifespan.
- Software Updates: Keep your earbuds’ firmware up to date to ensure the best performance and security. Check the manufacturer’s app or website periodically for updates.
By following these steps, you’ll be able to enjoy crisp, clear audio from your wireless earbuds for years to come, while also protecting your investment in high-quality technology.
Conclusion: Protect Your Investment
Cleaning your wireless earbuds may seem like a trivial task, but it plays a significant role in ensuring their longevity and maintaining high-quality audio output. By following these seven steps and integrating regular cleaning into your routine, you’ll safeguard your investment while enjoying a hygienic and optimal listening experience every time you pop your earbuds in. Remember, prevention is better than cure – a little care goes a long way in keeping your favorite audio companions healthy and happy!